How to create a custom dynamic WordPress widget?
In this article, you will learn how to create a custom dynamic WordPress widget. I will create a custom dynamic widget in WordPress that will display the recent posts. A number of recent posts will be managed by the widget itself.
I will make a number of post fields in the admin widget from where you can pass the value for how many posts you want to display on your front end of the website.

Firstly, You will need to set up the widget. To set up the custom dynamic widget you need to consider the 5 steps.
- The construct part of the dynamic WordPress widget
- Creating dynamic WordPress widget front-end
- Creating custom dynamic widget Backend
- Dynamic widget admin form
- Registering the custom dynamic WordPress widget
To setup up the widget, you can use the below code to understand the basic things. you will need to use below code inside your theme functions.php file. If you are creating a plugin then you can use this code insite your plugin file.
If you are using a child theme in WordPress then you should use this code the functions.php file of your child theme. if you don’t know how to create a child theme then follow our another article how to create a child theme in WordPress.
class ts91_recent_post_widget extends WP_Widget
{

	// The construct part of dynamic widget
	function __construct()
	{
		// construct code will go here
	}

	// Creating dynamic widget front-end
	public function widget( $args, $instance )
	{
		// dynamic widget front end will go here
	}

	// Creating dynamic widget Backend
	public function form( $instance )
	{
		//admin form part will go here
	}

	// Updating dynamic widget replacing old instances with new
	public function update( $new_instance, $old_instance )
	{
		//this function will update the instance
	}

// Class ts91_widget ends here
}

//Registering the dynamic widget
function ts91_register_widget()
{
    register_widget( 'ts91_recent_post_widget' );
}
add_action( 'widgets_init', 'ts91_register_widget' );
Now, you need to fill the widget construct and functions as per need. I am creating a recent post widget so I will use the functions for that. You can now use the below code to create a custom dynamic widget.
class ts91_recent_post_widget extends WP_Widget
{

	// The construct part of dynamic widget
	function __construct()
	{
		parent::__construct(

		// Base ID of your widget
		'ts91_recent_post_widget',

		// Widget name will appear in UI
		__('91 TechSquare Recent Posts', 'ts91_recent_post_widget_domain'),

		// Widget description
		array( 'description' => __( 'custom dynamic widget based on 91 TechSquare Tutorial', 'ts91_recent_post_widget_domain' ), )
		);
	}

	// Creating dynamic widget front-end
	public function widget( $args, $instance )
	{
		$title = apply_filters( 'widget_title', $instance['title'] );
		$no_of_post = apply_filters( 'widget_number_of_post', $instance['number_of_post'] );

		// before and after widget arguments are defined by themes
		echo $args['before_widget'];
		if(empty($title))
		{
			$title = "91 TechSquare Recent Posts";
		}
		if ( ! empty( $title ) )
		echo $args['before_title'] . $title . $args['after_title'];


		// This is where you run the code and display the output
		$args = array(
	        'posts_per_page' => $no_of_post, /* how many post you need to display */
	        'offset' => 0,
	        'orderby' => 'post_date',
	        'order' => 'DESC',
	        'post_type' => 'post', /* your post type name */
	        'post_status' => 'publish'
	    );
	    $query = new WP_Query($args);
	    if ($query->have_posts()) :
	    	echo "<ul>";
	        while ($query->have_posts()) : $query->the_post();
	            ?>
	            <li>
	            <a href="<?php the_permalink(); ?>"><?php the_title(); ?></a>
	       		</li>
	            <?php
	        endwhile;
	        echo "</ul>";
	    endif;
		echo $args['after_widget'];
	}

	// Creating dynamic widget Backend
	public function form( $instance )
	{
		if ( isset( $instance[ 'title' ] ) ) {
		$title = $instance[ 'title' ];
		}
		else {
		$title = __( '91 TechSquare Recent Posts', 'ts91_recent_post_widget_domain' );
		}

		//getting number of post value to form
		if ( isset( $instance[ 'number_of_post' ] ) ) {
		$number_of_post = $instance[ 'number_of_post' ];
		}
		else {
		$number_of_post = 5;
		}
		// Widget admin form
		?>
		<p>
		<label for="<?php echo $this->get_field_id( 'title' ); ?>"><?php _e( 'Title:' ); ?></label>
		<input class="widefat" id="<?php echo $this->get_field_id( 'title' ); ?>" name="<?php echo $this->get_field_name( 'title' ); ?>" type="text" value="<?php echo esc_attr( $title ); ?>" />

		<label>No. of post:
		<input class="widefat" name="<?php echo $this->get_field_name( 'number_of_post' ); ?>" type="number" min="0" value="<?php echo esc_attr( $number_of_post ); ?>">
		</p>
		<?php
	}

	// Updating dynamic widget replacing old instances with new
	public function update( $new_instance, $old_instance )
	{
		$instance = array();
		$instance['title'] = ( ! empty( $new_instance['title'] ) ) ? strip_tags( $new_instance['title'] ) : '';
		$instance['number_of_post'] = ( ! empty( $new_instance['number_of_post'] ) ) ? strip_tags( $new_instance['number_of_post'] ) : '';
		return $instance;
	}

// Class ts91_widget ends here
}

//Registering the dynamic widget
function ts91_register_widget()
{
    register_widget( 'ts91_recent_post_widget' );
}
add_action( 'widgets_init', 'ts91_register_widget' );
That’s it, Now you can see the widget in the appearance->widget inside your WordPress admin panel.
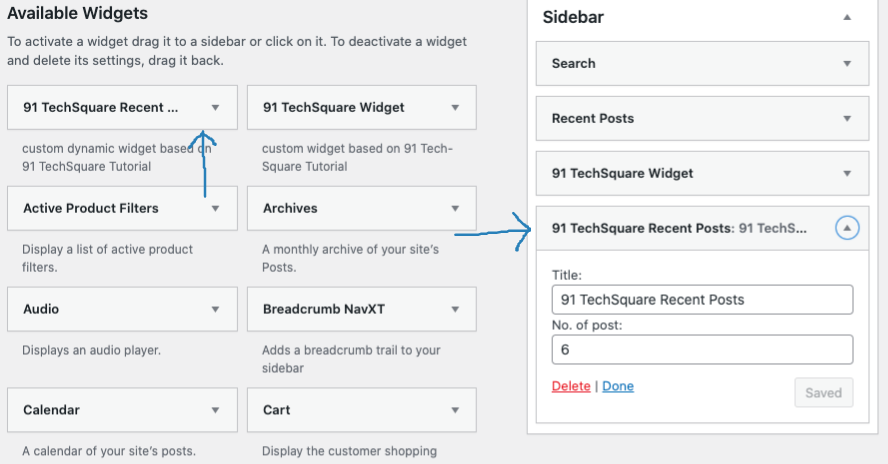
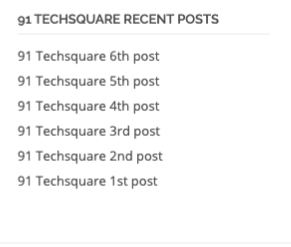
As you can see the custom dynamic widget is registered inside the widgets. You can use this widget in any widget area of your theme. You can customize this widget according to your need and requirement. See the output of this widget in the below image.
Now you learned how to create a custom dynamic widget in WordPress. If you want to start from a normal widget then you can follow our other article How to create a custom widget in WordPress.


Thanks, I was really looking for that kind of article. You explained everything well.